March 2024 Release Notes
- Rajeev Goel
- Mar 8, 2024
- 3 min read

Changes to the main plan page
The bottommost (blue) section on the primary planning page has been relabeled from “Cutting Ticket” to “Plan”. More importantly, the layout of the header containing the buttons and score bubble has changed to look like this:

First, notice that the Print button has been renamed to Full screen. The button’s functionality remains the same as before, but the new name more accurately reflects what it really does. The button opens a new tab in your browser with the plan displayed in a full page format. From that page, you can press the Print button to actually print the plan.
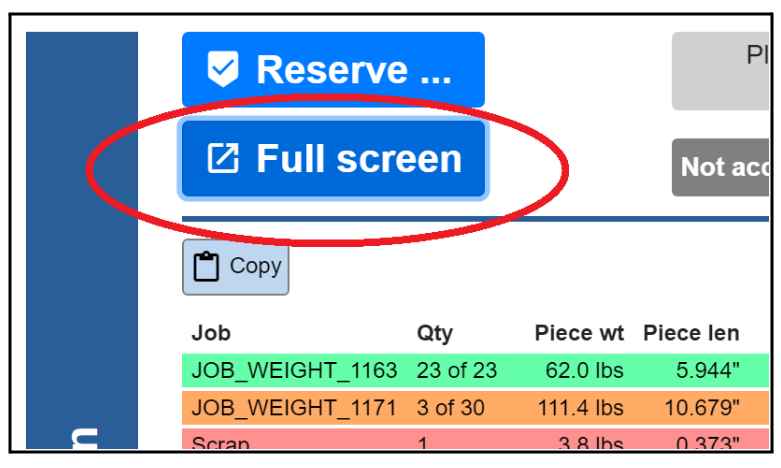
Next, there is a new gray text box which displays the user name of the planner who was responsible for generating the plan, along with the date and time that the plan was generated. Also, the phrase “auto-generated” is used for plans generated by AccuFit’s own nesting algorithm, whereas the phrase “last edited” is used for plans that were customized by the planner using the layout editor.

Most importantly, there is a new toggle switch that allows the planner to manually change the state of the plan between Not accepted and Accepted. The difference is that an accepted plan is saved permanently in the database and appears in the reports, whereas a not-accepted plan does not. Therefore a plan which is accepted can be accessed later by any user if they would like to view the details or print the plan. A not-accepted plan will be discarded as soon as the user navigates away from that plan.

AccuFit assumes that when the planner reserves material as part of a plan that the planner intends to keep that plan. Therefore a plan that is reserved is automatically marked as accepted. After reserving, if the planner wishes to unaccept the plan, he/she may do so by flipping the toggle switch back to the left. The same assumption applies for when a plan is printed. Printing a plan automatically marks it as accepted, but the planner can override this by use of the toggle switch after it is printed.
Changes to the full-screen plan page
The full-screen view of a plan can be accessed by pressing the Full screen button on the main plan page or by clicking any of the rows in the Accepted plans report. The header at the top of the full-screen plan view has changed to look like this:

Firstly, there is a new Sort by box which allows the user to sort the tags based on a criteria of his/her choosing. This is similar to the Sort by box which appears on the main planning page. And in fact, the setting from the main plan page will automatically carry over to the full-screen page, so that the user can set their preference once and forget about it.

The same plan information box which displays the user name and date/time of the plan is shown on the full-screen view as well:

And the same toggle switch to mark a plan as Not accepted or Accepted is also available from the full-screen view:

Note that pressing the Print button will automatically mark a plan as accepted. However, after the fact, the user can revert the plan back to not-accepted by flipping the toggle switch.
Changes to colors in bar, plate, and block diagrams
When hovering the mouse over different job pieces within a bar, plate, coil, or block diagram, the highlight color is now be bright yellow in order to better distinguish the highlighted piece from the other pieces in the diagram. Similarly, the corresponding row in the nesting table will be highlighted in yellow.
Also, for 3D block diagrams (3rd screenshot below), different jobs on the same tag are colored using different shades of green (for current jobs) or different shades of orange (for filler jobs), as opposed to previously when we were using the same shade for all jobs.


These changes to the main plan page, full plan page and color changes for bar, plate and block will help the planners visual and execute their cutting plans easier than ever before. This are significant improvements and visually very appealing to see and work with. Great Job!